Thursday 15th of October 2026
Darktable is a free Raw workflow application that aims to fulfill the same role Lightroom, Capture One, and similar. Like a lot of free, open-source software , it is an odd mix of highly capable and awkward to use, with many of its features using somewhat inpeneterable terminology more useful to colour scientists than photographers. It also suffers from another common issue with such software: bad default settings; this is usually done in the name of giving the user choices, but in practice it’s just overwhelming. The aim of this guide is to help you get past the initial difficulty hump and start being productive with Darktable.
Step 1: interface appearance
The default appearance of the Darktable interface is supposed to be non-distracting, so your images are the main focus. However, I think it goes a bit too far in this regard, occasionaly making it hard to read at a glance. Fortunately, Darktable employs another feature common to open-source software: extensive customisability, in this case via the use of CSS.
Open Darktable’s settings window, select the General section, and choose the darktable
theme. Then, tick the box that says ‘modify selected theme with CSS’, and
copy and paste the following into the big text box:
@define-color c1orange rgb(240, 144, 58);

notebook tab:checked label {
  color: @c1orange;
  border-bottom-color: @c1orange;
  background-color: @plugin_bg_color;
}

checkbutton check,
checkbutton:checked check,
entry:checked,
treeview check:selected {
  color: @c1orange;
  background-color: @bg_color;
}

.dt_module_active #module-header button:first-child {
  color: @c1orange;
}

.dt_module_focus #iop-panel-label {
  color: @c1orange;
}

#thumb-main #thumb-altered {
  color: shade(@c1orange, 0.8);
}


#iop-expander #module-header {
  border-top: 1px solid black;
  border-radius: 9px 9px 0 0;
  background-color: @plugin_bg_color;
}

.dt_plugin_ui {
margin-bottom: 1px;
}

#left,
#right {
  background-color: @scroll_bar_bg;
}
This will add a little more contrast to the interface, and add a few orange highlights to some areas – this latter is mostly just my preference, making Darktable a little reminiscent of Capture One, an application I am much more familiar with.
Step 2: better settings
Superficial stuff out of the way, lets change some settings to make things a bit nicer. In Darktable’s settings window, set the following options:
-
Lighttable→ ‘expand a single utility module at a time’:[✔] -
Lighttable→ ‘scroll utility module to the top when expanded’:[✔] -
Lighttable→ ‘enable smooth scrolling for lighttable thumbnails’:[✔] -
Darkroom→ ‘show loading screen between images’:[ ] -
Processing→ ‘auto-apply pixel workflow defauts’:scene-referred (AgX) -
Processing→ ‘activate OpenCL support’:[✔] -
Processing→ ‘OpenCL fast mode’:[✔] -
Miscellaneous→ ‘show splash screen at startup’:[ ] -
Miscellaneous→ ‘show welcome screen on next run’:[ ] -
Miscellaneous→ ‘mouse wheel scrolls modules side panel by default’:[ ] -
Miscellaneous→ ‘duration of the UI transitions in ms’:100
That’s it for settings – you can close the window now.
One last change, to enable capture sharpening by default. Click ‘darkroom’ in the top
right, then click the ⏻ in the modules section on the right. This shows a list
of all currently active modules. Near the bottom is one called ‘demosaic’. Click
its name to expand it, then enable [✔] the ‘capture sharpen’ option. Click the
𑁔 button to the right of the module name and choose ‘store new preset…’.
Call it ‘sharpened’ or something, then enable [✔] the ‘auto apply this preset to
matching images’ option, and then click ‘ok’.
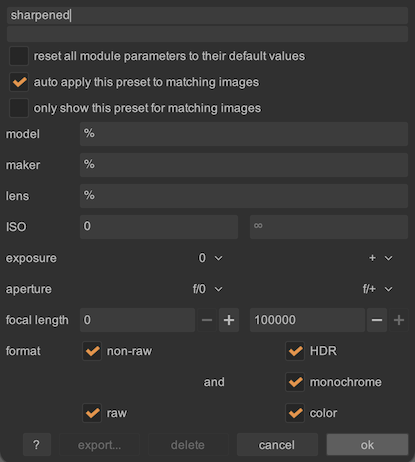
This will work well for most images, which is why we’ve set it to be enabled by default, but for particularly noisy images you may want to disable it.
Step 3: practical default modules
A ‘module’ in Darktable terms is basically a processing step: sharpening, white
balance, rotation, that sort of thing. There are also ‘utility’ modules, for
things like edit history, metadata viewing, and image export. In all there are
over a hundred modules, but fortunately we only really need to worry about a small
subset of them, and we can create a ‘module preset’ that we can set to be the
default. At the top of the modules list on the right, just under the histogram
display, click the 𑁔 button and choose ‘manage presets…’.
On the window that appears, click ‘New’, and choose a name for your module
preset; I used ‘Quick Raw’, but it’s entirely up to you. Click the misleadinly-lablled ‘Rename’
button, then click the × button at the top right of each of the module groups,
then click + to add a module group, then give it a name – something like ‘Main’
s fine. You can aso click the circle to the left of the name to pick an icon for
the group.
Next, Click the central + button below to add some modules. I recommend the
following:
- AgX
- color balance rgb
- color equalizer
- sharpen
- color calibration
- contrast equalizer
- crop
- tone equalizer
- exposure
- rotate and perspective
- lens correction
- denoise (profiled)
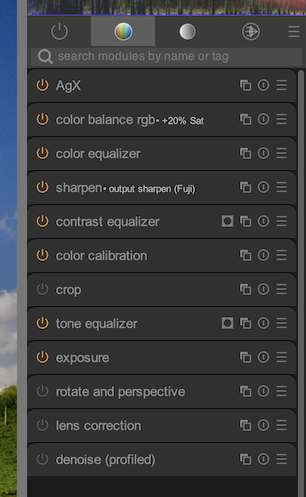
Those twelve modules are all you’ll ever need for the majority of your images; in many cases you’ll only need two or three.
Note: there are a couple of additional modules that are always enabled, but not shown on this list. They can be seen on the ‘currently active modules’ list as described earlier, and include required ones such as demosaicing, orientation, and input and output colour profiles. Their settings rarely need to be adjusted, which is why I didn’t include them on the default module list.
No comments
Write a comment: